Pages

Sunday, April 29, 2012

Sowing Seeds Directly in the Garden Bed Part 1

Before planting anything in the garden, you will need a planting plan. This plan should take into account:
  • the amount of space allocated for gardening
  • the amount of sun the area gets
  • height of plants and the amount of spacing between plants
  • how to partner plants together for maximum area usage
The keys to successfully sowing seeds directly into the garden bed are
  • planting at the appropriate time of the season 
  • keeping the seeds moist until they germinate 
  • planting at the appropriate depth
  • sowing more than one seed per hole
The best time to sow seeds directly into the garden in the low desert area is in late March to early April. However, this time can be stretched through April as long as you are prepared to keep a close eye to watch your seedlings for signs of stress. I sow 2 - 3 seeds per hole with the expectation that I will need to thin the seedlings when they are 2 - 3 inches in height.
Sowing seeds directly into the garden bed also prevents one of the challenges I face, over-watering, since the garden bed drains off excess water. Since my goal is to establish an environmentally friendly garden I don't want to run the sprinkler system twice a day. Typically I run my sprinkler system on an as needed basis, every two to three days. Therefore, I use my watering can twice a day to keep the seeds moist on non sprinkler watering days, once in the early am, (usually before 7 AM) and again around 1 PM. On sprinkler days I use my watering can just for the afternoon watering. It's not hard, it just takes dedication. But be of good cheer, if you are consistent with it, all seeds should germinate within the package germination time listed on the packaging. Once this happens you will be able to cut back to using the water can to once a day on non sprinkler days until a firm root system is established, usually one - two weeks after seed germination.

Growing Strawberries

After unsuccessfully searching for weeks and weeks for strawberry seeds, I purchased two potted strawberry plants from Lowes. I really wanted to grow everything from seeds this gardening season but it was either purchase the plants or not have any at all. So, I purchased the plants.

Here are the steps I took to plant my strawberries:
  • There were three plants in each pot so I prepared to separate them as gently as I could to avoid damaging the root systems. 
  • I dug each plants respective hole and placed them inside level enough for the base to remain above ground. 
  • After back-filling the hole I firmed the soil around each plant. 
  • I carefully mounded soil to make a small dirt rim in a eight inch circumference around each newly planted strawberry plant.
  • Lastly, I used my watering can to give them a nice long drink.
Two of the strawberry plants are very small and have only a small root system and few leaves. I don't know if they will make it but the other four plants I am sure will establish themselves nicely. 


My plan is to water them daily in the early AM with my watering can, on non sprinkler days, when I am watering the seeds that I am still awaiting their sprouting.

Here is a picture of one newly planted strawberry plant
Photo

Saturday, April 28, 2012

Transplanting Seedlings Into Garden Bed

As sometimes happens when sowing plants from seeds, not all of them sprout, some are weak and sprout but die off, and some you accidentally kill. But I'm not the give up type so, the ones that were strong and doing well I planted in their prepared spots and in replacement of the seedlings that hadn't faired so well, I sowed seeds directly into the garden bed. See blog article on Sowing Seeds Directly in the Garden Bed

It's important to treat seedlings very gently. If you break their stems, it will die and all your nursing will be in vain. I use a hand shovel to dig a hole just deep enough to fit the seedling base in and use my hand to pack the earth tightly around the seedling's rooting system. After planting all seedlings into their new home, I run the sprinkler system to give them a good watering. For the next week I keep a close eye on them and if they look thirsty on non-sprinkler days I use my watering can to give them a drink. I only do this if the leaves look limp as if they are about to wilt. I want to care for the new seedlings and not let them die but if they are doing well, I don't water them to allow them to adjust to their new environment and water schedule.

All plants do well and perform better when they have deep roots. This is encouraged by deep saturated watering instead of light daily sprinkling. You will not see a lot of new leaf growth while the plants are getting used to their new home. Instead of focusing on putting out new leaves, the plant is focusing on establishing a strong root system. You will know that this is and has taken place when the new plantings begin to produce new leaves and have obvious growth. 
 
Here are pictures from the seedlings that were transplanted into the garden:

Corn and Peas


Hot Peppers


Tomatoes
 

Garlic
 

Watermelon
 

Lettuce Mixture
 

Cucumber


Please write any questions or comments in the comment box. I look forward to hearing from you.

Monday, April 16, 2012

Russet Potatoes - Part I

I like potatoes. Not too many people don't. Whether you like them baked, fried, hash browned, sautéd, scalloped, or chipped, there are plenty of ways to make them a delicious part of almost any meal. I decided to give growing them a try. When I purchased a 10 lb. bag of potatoes I decided to put three potatoes away to use as my starter potatoes.

I placed the potatoes on the center of a dark colored towel, wrapped them gently, and placed them at the back of my cabinet to protect them from sunlight. Before I would plant them I needed to make sure that they would sprout. I'm sure you've noticed the pale little nodes sticking out of a potato, or better yet, when you didn't eat them in a timely fashion, they began sprouting right in your cabinet. These are the eyes, the green leafy part of the potato that you see above the ground when growing potatoes.

After about a week I checked them and noticed that the eyes had begun to sprout and grow. 

These should do just fine


So, I cut the potatoes into sections making sure that each section has at least 2 - 3 eyes that were beginning to grow. In the garden bed I dug a hole just deep and big enough to place the potato and cover it with a shallow layer of soil. I did not implement any special watering schedule and am watering the potatoes at the same interval that my sprinklers are currently set, every 2 - 3 days.

Let's see what happens!

Saturday, April 14, 2012

Not Chicken Wire But Dog Deterrent Fencing

One of my biggest concerns is how to keep my dogs from digging in the garden. I know they do it to unearth a cool area in which to lay but that doesn't make it any less frustrating. So, I did some research to discover the most economical way to put of dog deterrent fencing. A fellow gardener suggest that I put up chicken wire. And sure enough, he was right. It was the most economical fencing to invest in. A 24" X 50' roll cost $8.27 at Lowes and the stakes were about $2.50.
Zoomed:  POULTRY NETTING 24"X50'-2" 20GA 
All that was needed to put it up was a hammer to hammer the stake into the ground. 


My three year old dog Cleatis pretty much understands the rules of the house and since he doesn't like getting in trouble, he doesn't press his luck by pushing on the fencing. My daughters 1 year old puppy Hersheys is primed to test her boundaries at every junction and apparently doesn't mind getting confined to the kennel when she does what she's not supposed to do. You see, my dogs are indoor dogs and don't need to dig in the dirt to keep cool, unless I've had to leave them in the backyard for an extended period, all Hersheys fault. They just come in the house and lay on the cool tile when they've had enough of running around outside.


Hersheys has tested the boundaries of the fencing and likes to poke her nose under the bottom of the wiring and try to pry her way in. I think after doing it three times and getting punished she's learned her lesson but with all the labor and effort I've invested in growing my garden, I'm not taking any chances. I try to keep an eye out for her when she's outside in the yard and tell her "No" when she puts her nose to the ground anywhere near the fencing. 


All this is to say, if you have a dog that will test the boundaries, you may want to place your stakes closer together than where I placed mine, about 10 ft. I would venture that every 5 ft would keep it taunt enough to deter invitation to test the fencing.

Here is a picture of the gauge fencing. It's a little more expensive than chicken wire but it is thicker and much more a deterrent for dogs. Cpl. Cleatis is not happy about being fenced out of any area in the back yard. Especially since he patrols the cylinder block fencing.


Here is a picture of the chicken wire with Hersheys sitting next to it. In this picture you get a better idea of the difference between gauge and chicken wire fencing.

Saturday, April 7, 2012

Preparing the Soil (Sand)

If you live in the desert, you have coarse sand and you're probably wondering if anything will grow in your garden. Yes! With proper preparation and soil amendment, you too can grow a nice fruit and vegetable garden.

Step One: Tilling - If you currently do not have anything growing in the area you plan to start your garden, you have it easy, well... sort of. At least you don't have to worry about lawn, plant, or tree removal. A few growing weeds will be dispensed with in the following steps so they present no cause for concern. Unless they have flowers and have set to seed. If this is the case, we suggest you cut off the seed heads and throw them in the garbage before beginning the following garden prep process.
  •  To break up sandy soil and make the garden easier to work, and allow room for roots to spread and take hold, I purchased a Hound Dog Garden Steel Tiller 
Hound Dog Garden Steel Tiller It requires elbow grease but it does a fantastic job. To make soil tilling easier I ran the sprinklers right before beginning to till the garden.

Step Two: Amending Soil
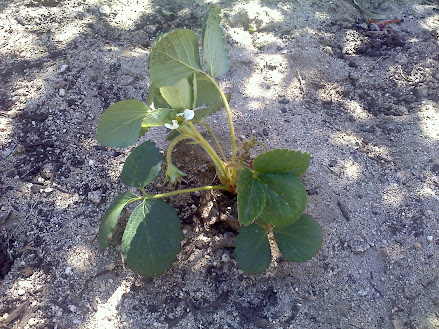
  • Top Soil - Sandy soil requires amendments in order to help it retain moisture. This helps reduce water requirements and also helps sandy soil become more like organic gardening soil. Below is a picture of what the garden bed looks like right after tilling and shows the top soil that will be used to mix in with the sandy earth.

Each bag was opened and contents were even distributed on the garden bed. I then used a Hula Hoe to mix the top soil into the garden bed.

  • Organic Fertilizer and Soil Amendment - In addition to needing top soil to help maintain moisture, organic matter is needed to amend soil and transform it more into garden soil. Since I choosing to have an organic garden, I chose to use Organic Garden Compost as a soil amendment. Below is a picture of the garden bed after Top Soil has been evenly distributed and worked into the garden bed, with the compost that I used.


I followed the same procedure used to distribute top soil. Below is a picture of the garden bed after the compost was distributed and worked into the garden bed.


Watering schedule, although there isn't anything in the garden bed yet, is running the sprinklers 10 minutes every three days. Although the garden bed is new, there are other areas throughout my property which requires watering, such as my lawn, rose and flower bed. We will see these areas in other posts. By watering the garden bed I am helping to encourage an optimum growing environment rich in organic matter and nutrients that will be primed and ready for my greenhouse transplants.It also give me the opportunity to see any left over weeds or seeds that begin to set root which I go back over with the hula hoe to get rid of before bringing in my greenhouse plants.

In my next post we will discuss fencing to keep the dogs out of my garden bed. Grrrrr!!!